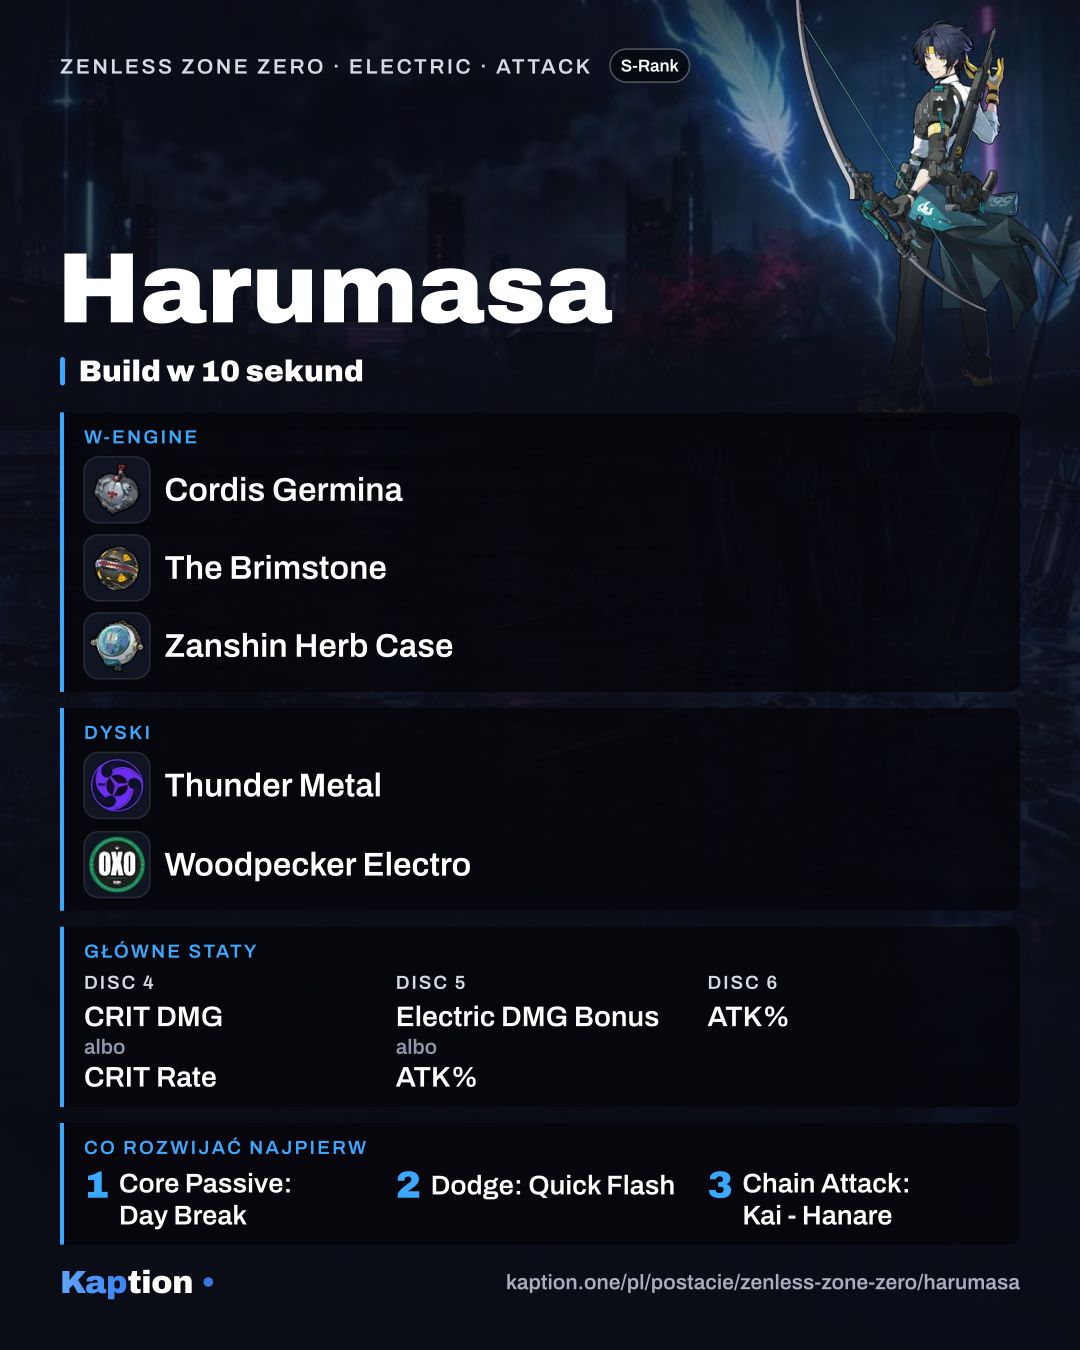
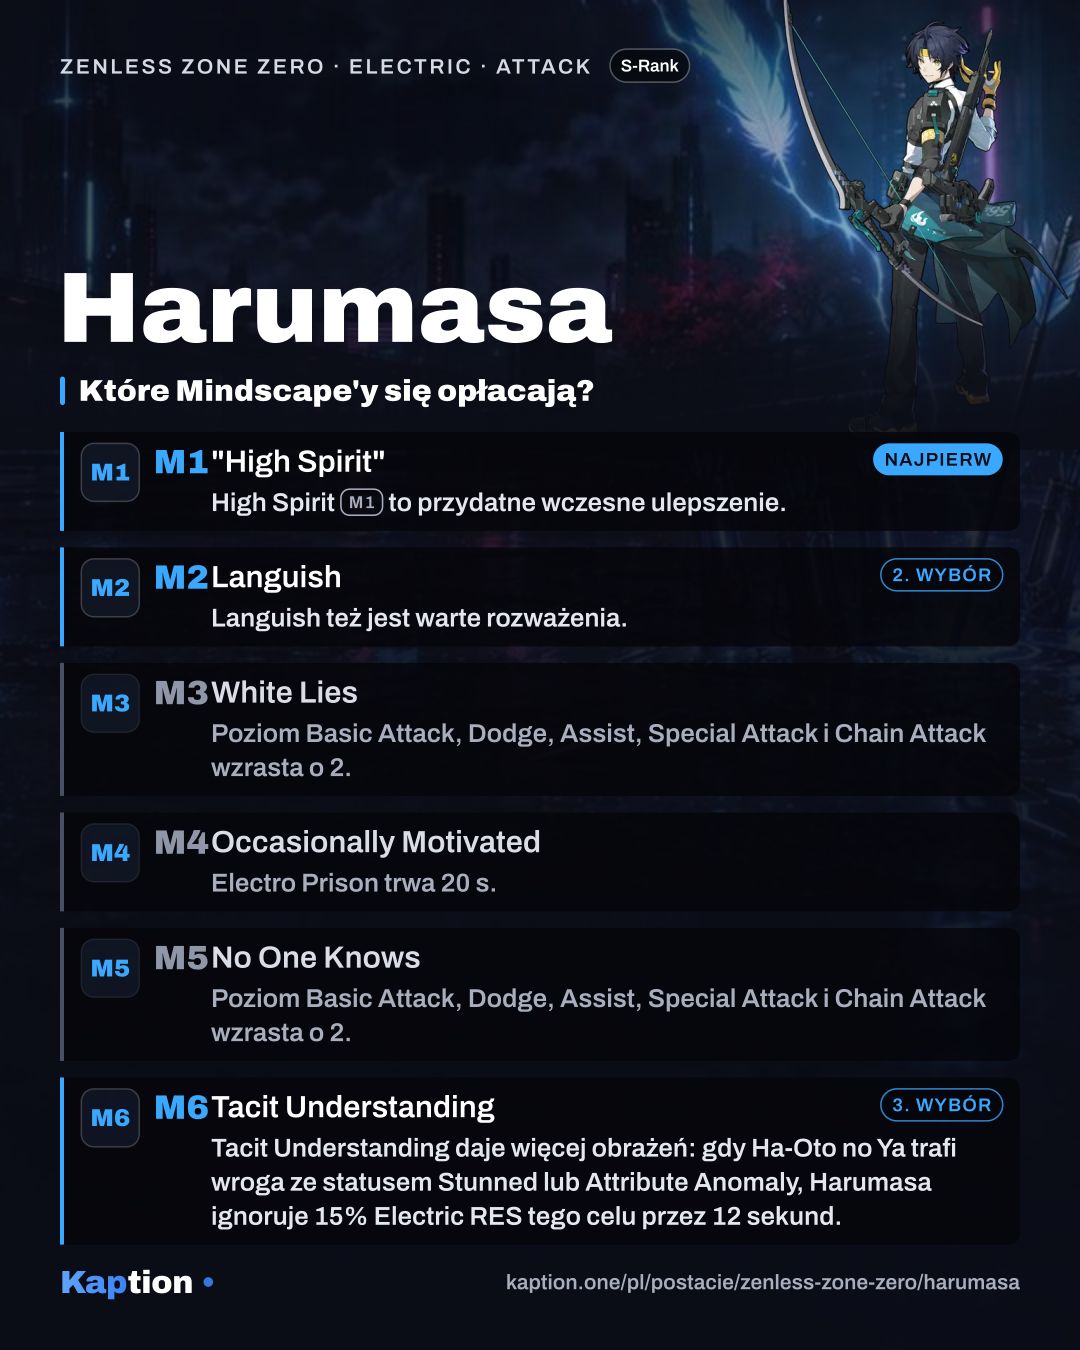
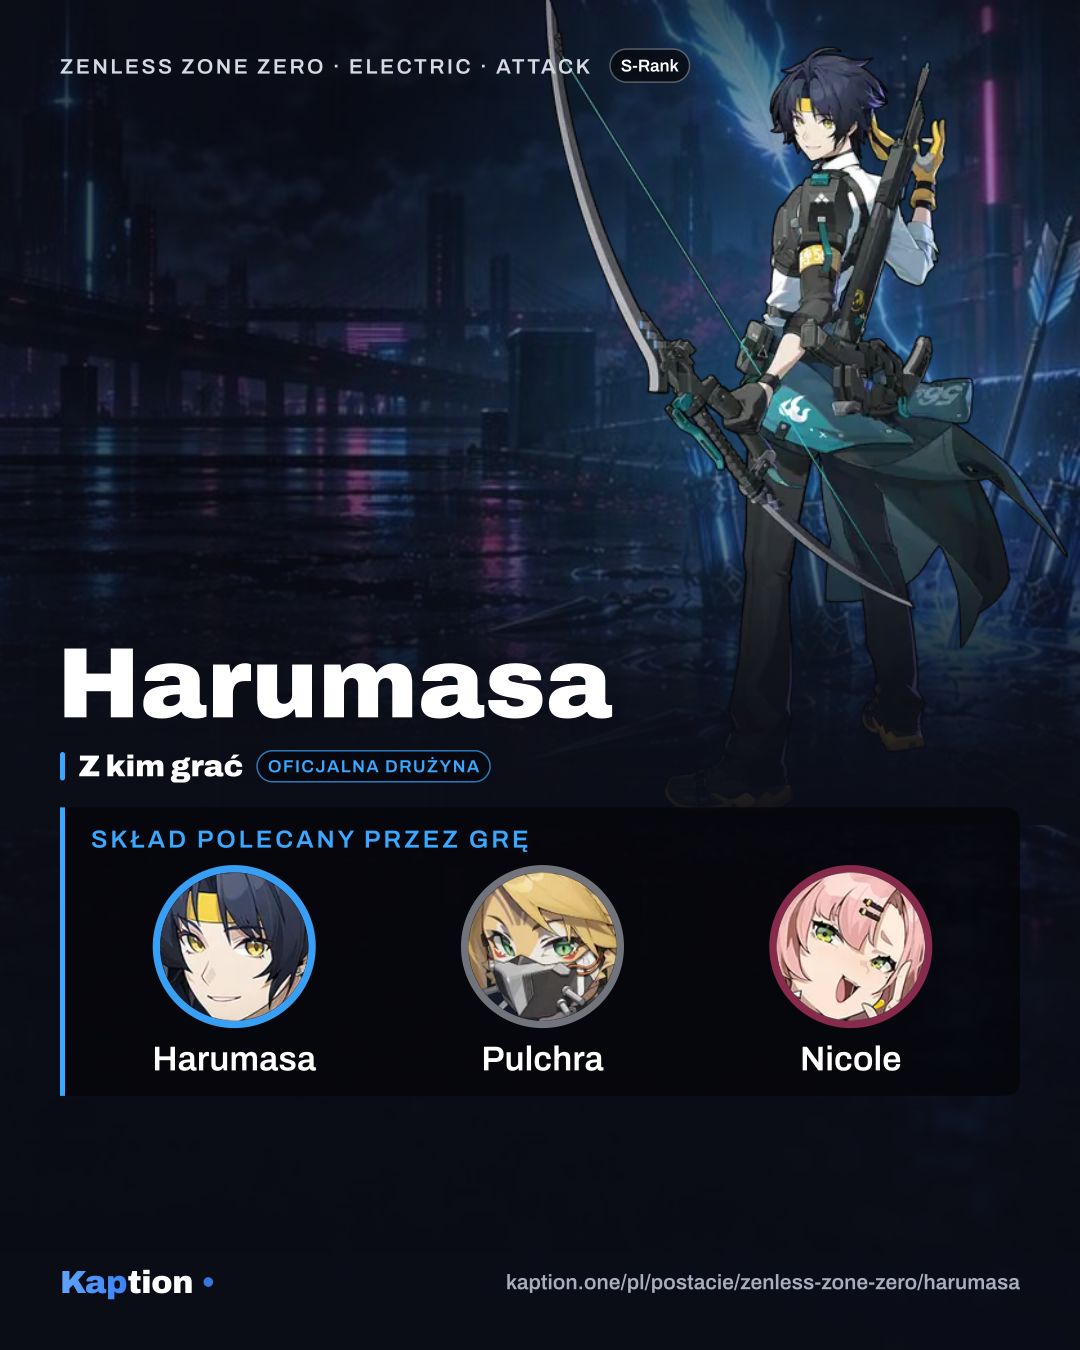
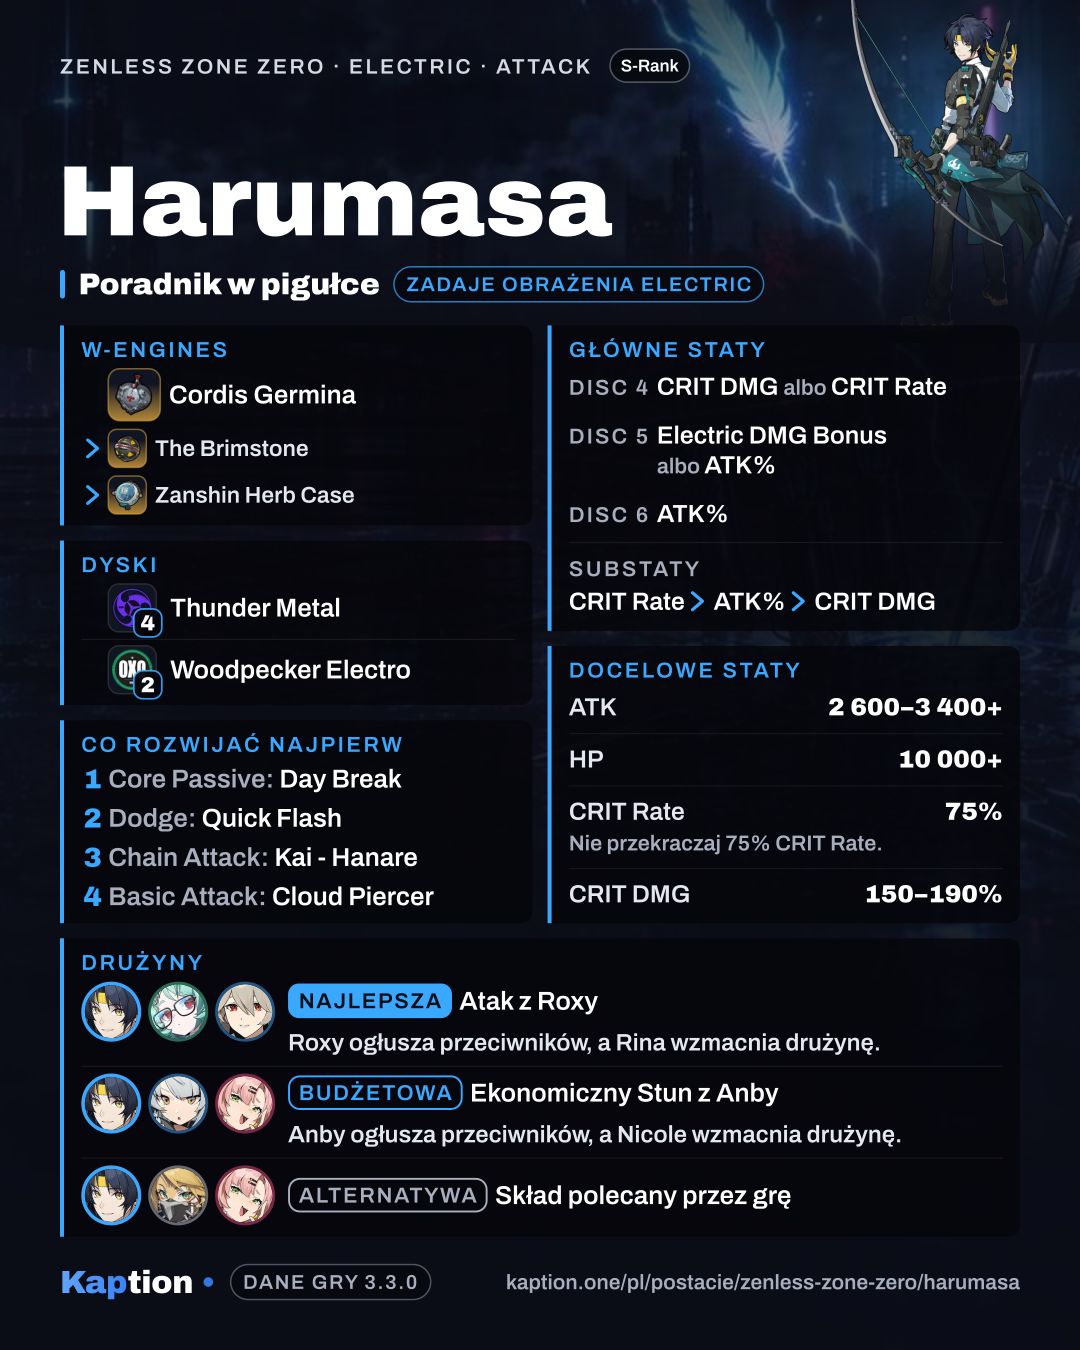
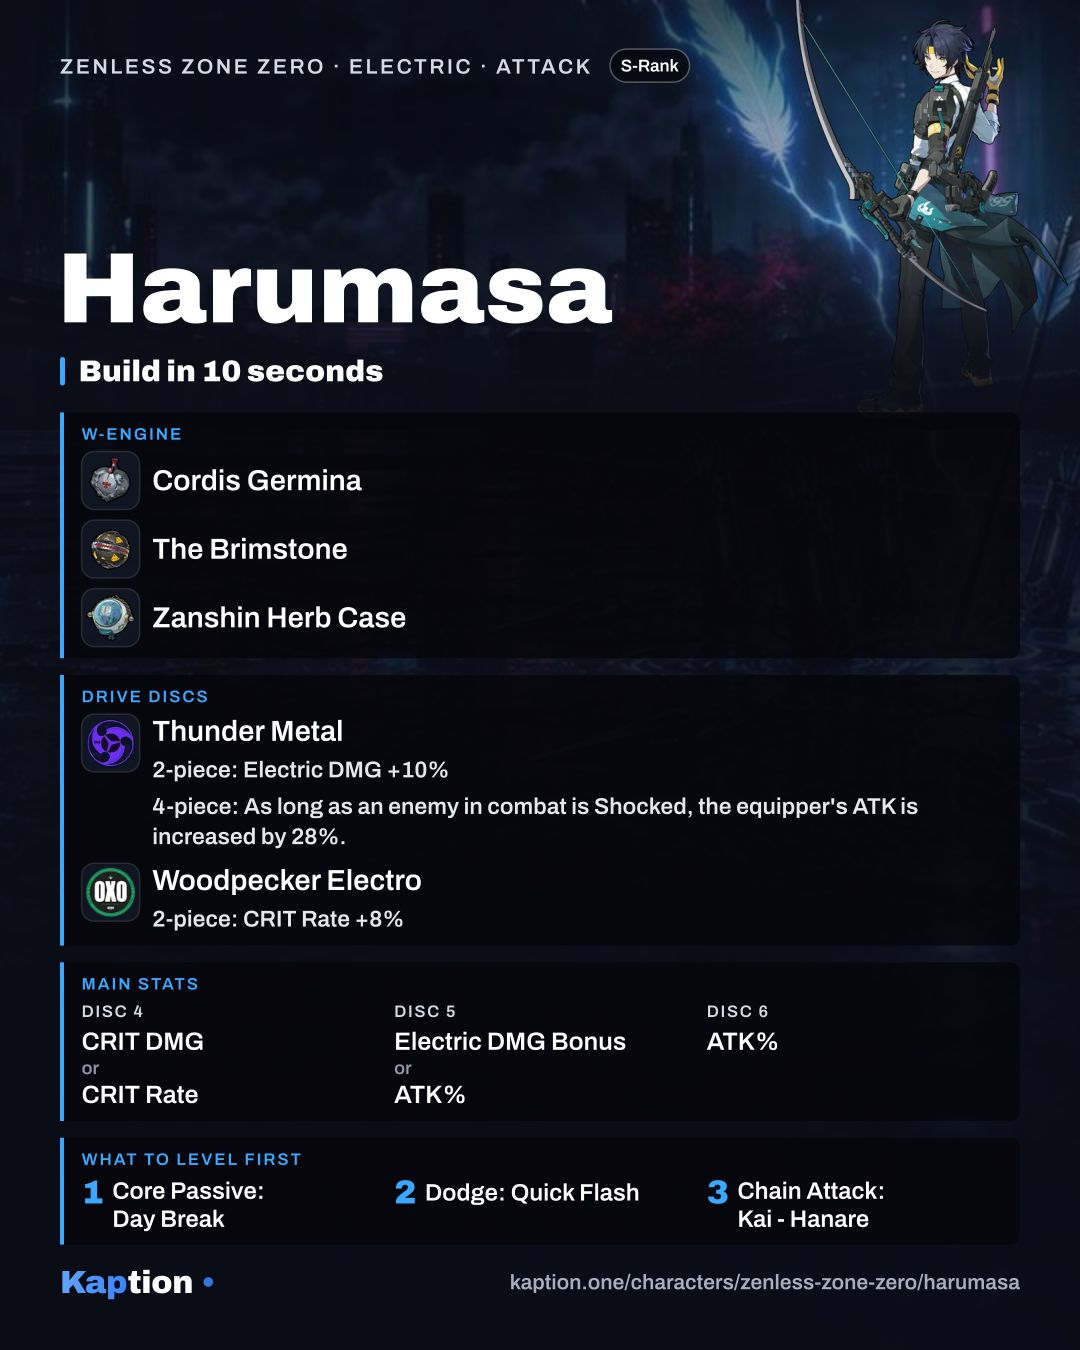
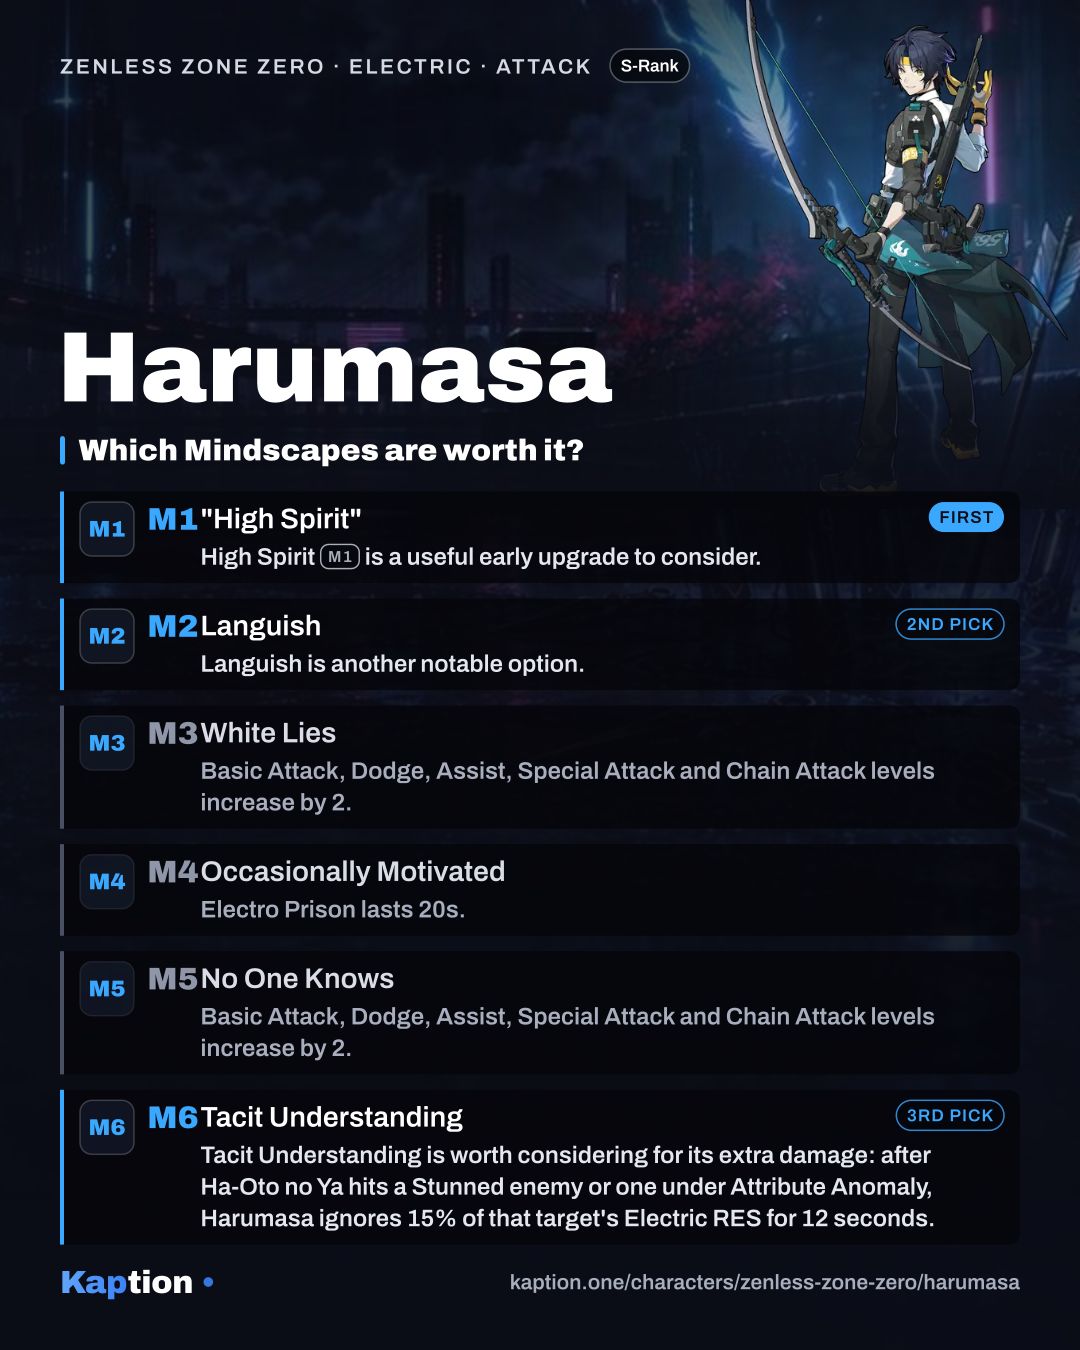
Nazwy po angielsku, jak w grze · podkreślone otwierają kartę · Priorytet = kolejność rozwijania (z danych gry)
-
Atak podstawowy
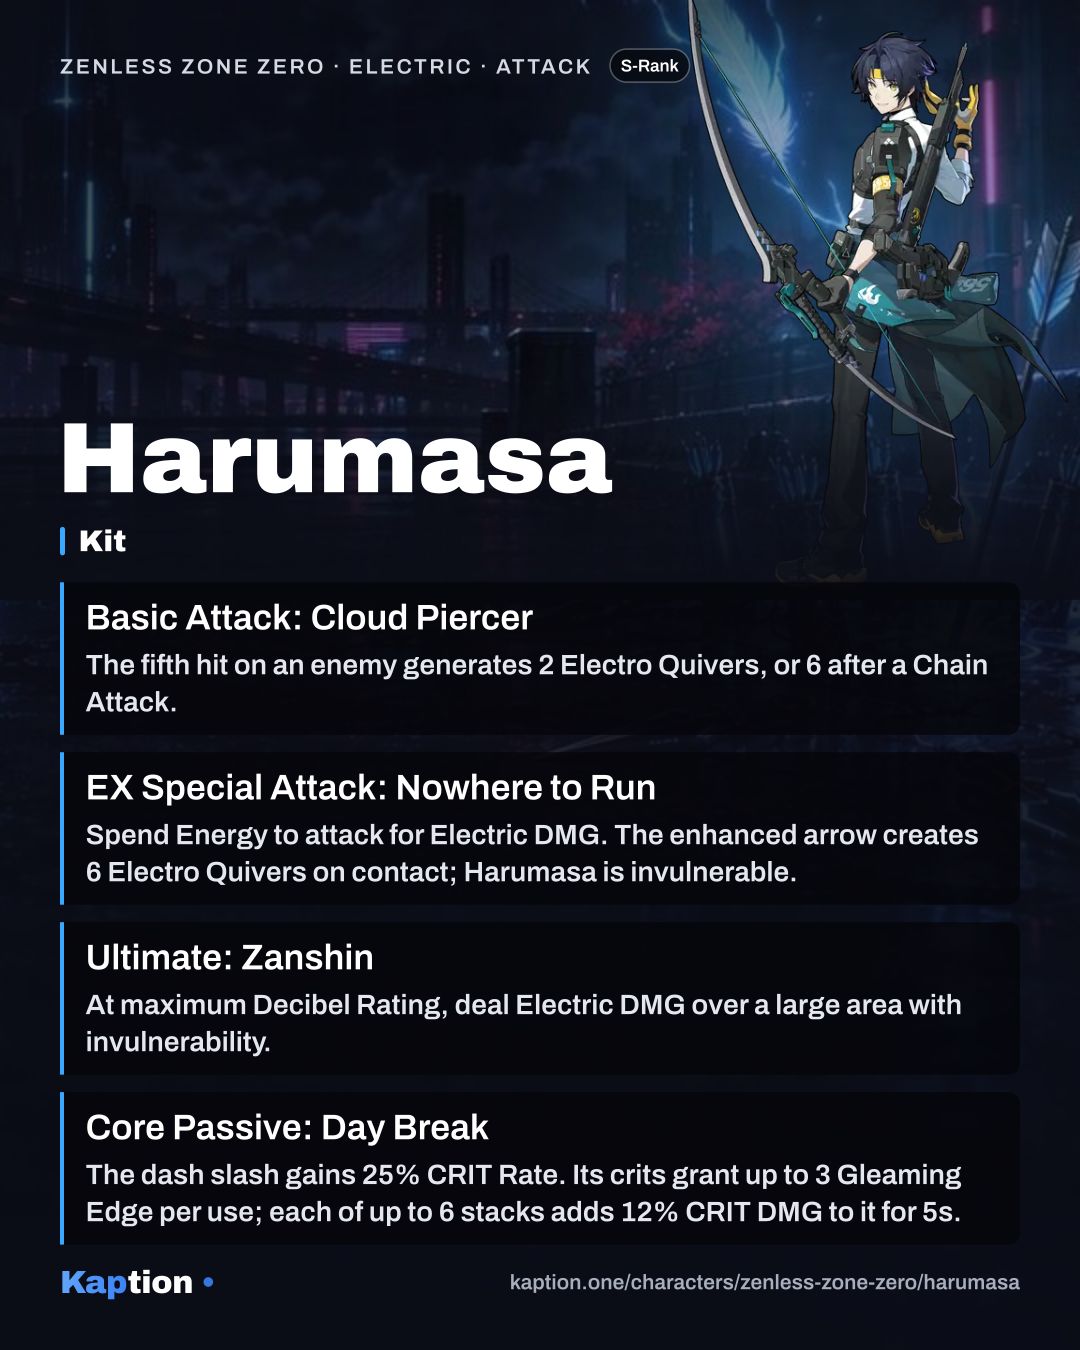
Basic Attack: Cloud Piercer
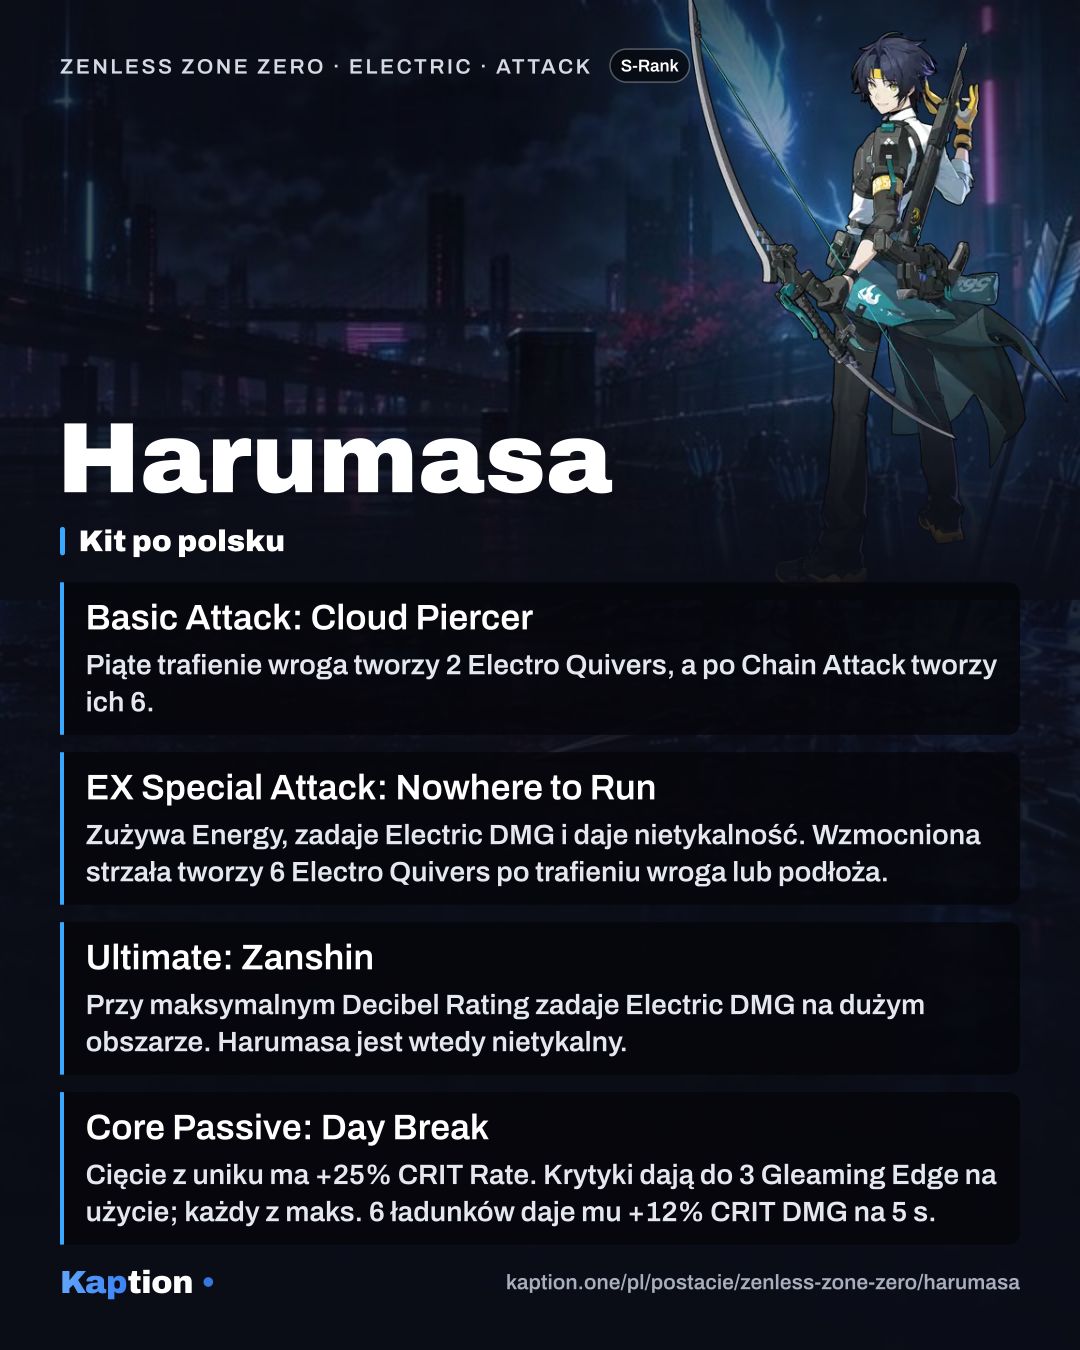
Priorytet Priorytet rozwijania 4 z 6 Piąte trafienie wroga tworzy 2 Electro Quivers, a po Chain Attack tworzy ich 6.
Press to activate:
Launch up to five piercing attacks ahead, dealing Physical DMG and Electric DMG.
When the 5th hit of the Basic Attack hits an enemy, it generates 2 Electro Quivers.
After activating a Chain Attack, the next time Harumasa activates the 5th hit of Basic Attack: Cloud Piercer and hits an enemy with it, it generates 6 Electro Quivers.
-
Atak podstawowy
Basic Attack: Cloud Piercer - Drift
Podczas podstawowego combo wychyl joystick i zaatakuj, by strzelić za Physical DMG i zmienić pozycję.
During Basic Attack: Cloud Piercer, drag the joystick and press to activate:
Shoot a ranged piercing attack and reposition towards the corresponding drag direction, dealing Physical DMG.
-
Atak podstawowy
Basic Attack: Falling Feather
Przytrzymaj po piątym Basic, Special, EX Special lub Chain Attack, by strzelić za Electric DMG. Możesz też przytrzymać, wycelować i puścić.
After the 5th hit of Basic Attack: Cloud Piercer, a Special Attack, an EX Special Attack, or a Chain Attack, hold to activate:
Immediately shoot Falling Feather at enemies ahead, dealing Electric DMG.
Hold to aim at a target and release to activate:
After drawing the bowstring and aiming, shoot Falling Feather at the target, dealing Electric DMG.
-
Atak podstawowy
Basic Attack: Ha-Oto no Ya
Falling Feather (Basic) po trafieniu odpala Electro Quivers. Ich strzały nakładają Electro Prison na 10 s; 2 ładunki oznaczają wroga jako X-Marked.
When the 5th hit of Basic Attack: Cloud Piercer/EX Special Attack/Chain Attack hits an enemy or the ground, it can generate 2/6/6 Electro Quivers. If there are no Electro Quivers on the field when any squad member applies an Attribute Anomaly to an enemy, generate 6 Electro Quivers. This effect can trigger once every 12s.
There can be up to 6 Electro Quivers present at a time. If there are any Electro Quivers present when Harumasa fires and hits enemies with Falling Feather, the Electro Quivers will activate and fire Ha-Oto no Ya at the enemies hit by Falling Feather, dealing Electric DMG.
Ha-Oto no Ya will apply Electro Prison to enemies hit, stacking up to 8 times and lasting 10s, repeated triggers reset the duration. While a target has at least 2 stacks of Electro Prison, they will be X-Marked.
-
Specjalna
Special Attack: Nowhere to Hide
Priorytet Priorytet rozwijania 5 z 6 Strzela za Electric DMG. Podczas strzału ma zwiększoną odporność na przerwanie.
Press to activate:
Launch an arrow forward, dealing Electric DMG.
Anti-Interrupt level is increased while using this skill.
-
Specjalna
EX Special Attack: Nowhere to Run
Zużywa Energy, zadaje Electric DMG i daje nietykalność. Wzmocniona strzała tworzy 6 Electro Quivers po trafieniu wroga lub podłoża.
With enough Energy, press to activate:
Launch daggers and an enhanced arrow ahead, dealing massive Electric DMG.
When the enhanced arrow hits an enemy or the ground, it generates 6 Electro Quivers.
Character is invulnerable while using this skill.
-
Priorytet Priorytet rozwijania 2 z 6 Szybki unik, podczas którego Harumasa jest nietykalny.
Press to activate:
A quick dash dodge.
Character is invulnerable while using this skill.
-
Unik
Dash Attack: Hiten no TsuruDodge
Zaatakuj w trakcie uniku, by zadać wrogom przed sobą Physical DMG.
Press during a dodge to activate:
Launch multiple piercing attacks ahead, dealing Physical DMG.
-
Unik
Dodge Counter: Hidden Edge
Zaatakuj podczas Perfect Dodge, by skontrować za Electric DMG. Podczas kontry Harumasa jest nietykalny.
Press during a Perfect Dodge to activate:
Pierces enemies in front, dealing Electric DMG.
Character is invulnerable while using this skill.
-
Atak łańcuchowy
Chain Attack: Kai - Hanare
Priorytet Priorytet rozwijania 3 z 6 Zadaje Electric DMG na dużym obszarze. Strzała tworzy 6 Electro Quivers po trafieniu, a Harumasa jest nietykalny.
When a Chain Attack is triggered, select the character to activate:
Unleash a piercing attack on enemies in a large area ahead then fire an enhanced arrow, dealing massive Electric DMG.
When the arrow hits the ground, it generates 6 Electro Quivers.
Character is invulnerable while using this skill.
-
Atak łańcuchowy
Ultimate: Zanshin
Przy maksymalnym Decibel Rating zadaje Electric DMG na dużym obszarze. Harumasa jest wtedy nietykalny.
When Decibel Rating is at Maximum, press to activate:
Unleash a piercing attack on enemies in a large area ahead, dealing massive Electric DMG.
Character is invulnerable while using this skill.
-
Wsparcie
Quick Assist: Braced BowAssist
Priorytet Priorytet rozwijania 6 z 6 Gdy aktywna postać zostanie wyrzucona w powietrze, wejdź za Harumasę i zadaj Electric DMG. Podczas ataku jest nietykalny.
When the active character is launched, press to activate:
Unleash a piercing attack at enemies ahead, dealing Electric DMG.
Character is invulnerable while using this skill.
-
Wsparcie
Defensive Assist: YugamaeAssist
Paruje nadchodzący atak i zadaje dużo Daze. Harumasa jest wtedy nietykalny.
When the on-field character is about to be attacked, press to activate:
Parries the enemy's attack, dealing massive Daze.
Character is invulnerable while using this skill.
-
Wsparcie
Assist Follow-Up: Yugamae - Slash
Zaatakuj po Defensive Assist, by wykonać serię cięć za Electric DMG. Harumasa jest wtedy nietykalny.
Press after a Defensive Assist to activate:
Unleash a series of slashes at enemies ahead, dealing Electric DMG.
Character is invulnerable while using this skill.
-
Unik
Dash Attack: Hiten no Tsuru - SlashDodge
W Awakened atakuj podczas uniku lub po Falling Feather (Basic), by ciąć wroga z X-Marked i zużyć 2 Electro Prison. Otrzymujesz o 40% mniej obrażeń.
While there are X-Marked enemies on the field, Harumasa will enter the Awakened state, switching Dash Attack: Hiten no Tsuru for Dash Attack: Hiten no Tsuru - Slash.
While in the Awakened state, press during a dodge to activate:
Rush forwards to the closest X-Marked enemy and execute a powerful slash, dealing Electric DMG.
When the slash hits the target, it consumes 2 stacks of Electro Prison. With less than 2 stacks of Electro Prison, X-Marked will be removed from the enemy. Before X-Marked is removed, repeatedly press to repeatedly use Dash Attack: Hiten no Tsuru - Slash. While no X-Marked enemies exist on the field, Harumasa leaves the Awakened state.
While in the Awakened state, press after Basic Attack: Falling Feather to quickly follow up with Dash Attack: Hiten no Tsuru - Slash.
During skill activation, Anti-Interrupt level increases, and DMG taken is reduced by 40%.
-
Umiejętność główna
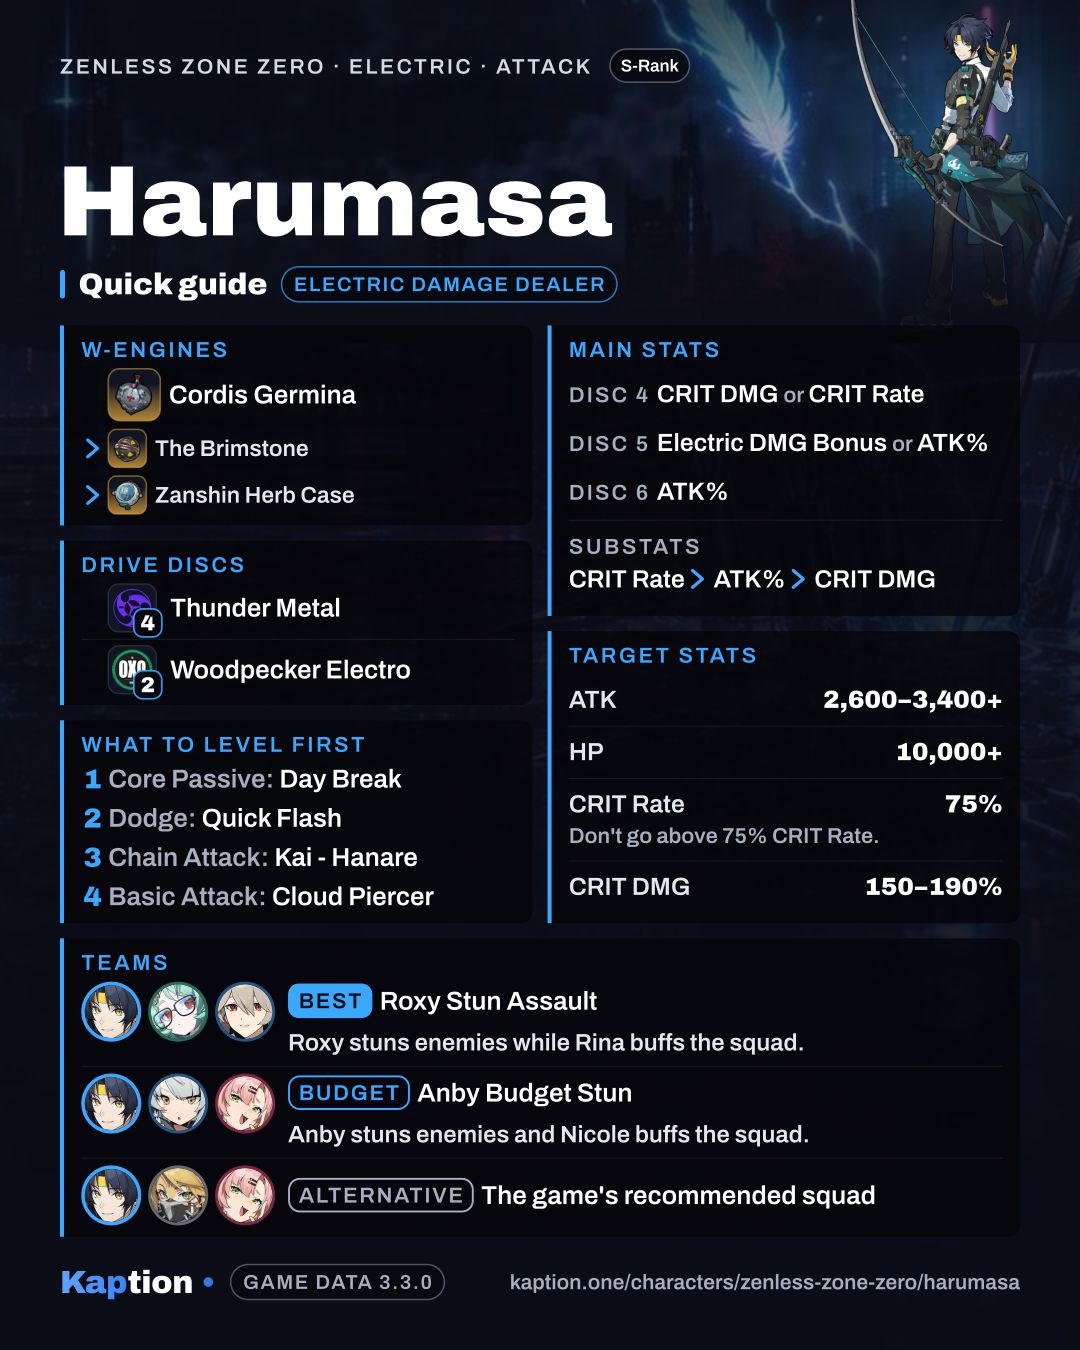
Core Passive: Day Break
Priorytet Priorytet rozwijania 1 z 6 Cięcie z uniku ma +25% CRIT Rate. Krytyki dają do 3 Gleaming Edge na użycie; każdy z maks. 6 ładunków daje mu +12% CRIT DMG na 5 s.
The CRIT Rate of Dash Attack: Hiten no Tsuru - Slash increases by 25%, and when Harumasa's Dash Attack: Hiten no Tsuru - Slash triggers a critical hit against an enemy, he gains 1 stack of Gleaming Edge, for up to a maximum of 3 stacks per use of the skill and stacking up to 6 times, lasting 5s, repeated triggers reset the duration. Each stack of Gleaming Edge increases the CRIT DMG of Dash Attack: Hiten no Tsuru - Slash by 12%.
-
Atak podstawowy
Basic Attack: Cloud Piercer
Priorytet Priorytet rozwijania 4 z 6 Piąte trafienie wroga tworzy 2 Electro Quivers, a po Chain Attack tworzy ich 6.
Press to activate:
Launch up to five piercing attacks ahead, dealing Physical DMG and Electric DMG.
When the 5th hit of the Basic Attack hits an enemy, it generates 2 Electro Quivers.
After activating a Chain Attack, the next time Harumasa activates the 5th hit of Basic Attack: Cloud Piercer and hits an enemy with it, it generates 6 Electro Quivers.
-
Atak podstawowy
Basic Attack: Cloud Piercer - Drift
Podczas podstawowego combo wychyl joystick i zaatakuj, by strzelić za Physical DMG i zmienić pozycję.
During Basic Attack: Cloud Piercer, drag the joystick and press to activate:
Shoot a ranged piercing attack and reposition towards the corresponding drag direction, dealing Physical DMG.
-
Atak podstawowy
Basic Attack: Falling Feather
Przytrzymaj po piątym Basic, Special, EX Special lub Chain Attack, by strzelić za Electric DMG. Możesz też przytrzymać, wycelować i puścić.
After the 5th hit of Basic Attack: Cloud Piercer, a Special Attack, an EX Special Attack, or a Chain Attack, hold to activate:
Immediately shoot Falling Feather at enemies ahead, dealing Electric DMG.
Hold to aim at a target and release to activate:
After drawing the bowstring and aiming, shoot Falling Feather at the target, dealing Electric DMG.
-
Atak podstawowy
Basic Attack: Ha-Oto no Ya
Falling Feather (Basic) po trafieniu odpala Electro Quivers. Ich strzały nakładają Electro Prison na 10 s; 2 ładunki oznaczają wroga jako X-Marked.
When the 5th hit of Basic Attack: Cloud Piercer/EX Special Attack/Chain Attack hits an enemy or the ground, it can generate 2/6/6 Electro Quivers. If there are no Electro Quivers on the field when any squad member applies an Attribute Anomaly to an enemy, generate 6 Electro Quivers. This effect can trigger once every 12s.
There can be up to 6 Electro Quivers present at a time. If there are any Electro Quivers present when Harumasa fires and hits enemies with Falling Feather, the Electro Quivers will activate and fire Ha-Oto no Ya at the enemies hit by Falling Feather, dealing Electric DMG.
Ha-Oto no Ya will apply Electro Prison to enemies hit, stacking up to 8 times and lasting 10s, repeated triggers reset the duration. While a target has at least 2 stacks of Electro Prison, they will be X-Marked.
-
Specjalna
Special Attack: Nowhere to Hide
Priorytet Priorytet rozwijania 5 z 6 Strzela za Electric DMG. Podczas strzału ma zwiększoną odporność na przerwanie.
Press to activate:
Launch an arrow forward, dealing Electric DMG.
Anti-Interrupt level is increased while using this skill.
-
Specjalna
EX Special Attack: Nowhere to Run
Zużywa Energy, zadaje Electric DMG i daje nietykalność. Wzmocniona strzała tworzy 6 Electro Quivers po trafieniu wroga lub podłoża.
With enough Energy, press to activate:
Launch daggers and an enhanced arrow ahead, dealing massive Electric DMG.
When the enhanced arrow hits an enemy or the ground, it generates 6 Electro Quivers.
Character is invulnerable while using this skill.
-
Specjalna
EX Special Attack: Nowhere to Run - Patrol
With enough energy, press after using the 4th/5th attack of Basic Attack: Cloud Piercer, Dash Attack: Hiten no Tsuru - Slash, an Ultimate, Dodge Counter: Hidden Edge, or Quick Assist: Braced Bow to activate:
Fire enhanced arrows forward in rapid succession, dealing massive Electric DMG.
When the first enhanced arrow hits an enemy or the ground, 6 Electro Quivers are generated. When the final enhanced arrow hits an enemy, it activates the Electro Quivers on the field, firing Ha-Oto no Ya at the target, dealing Electric DMG.
When the target's Electro Prison stacks are close to the maximum, fewer Electro Quivers will be activated.
Character is invulnerable while using this skill.
-
Priorytet Priorytet rozwijania 2 z 6 Szybki unik, podczas którego Harumasa jest nietykalny.
Press to activate:
A quick dash dodge.
Character is invulnerable while using this skill.
-
Unik
Dash Attack: Hiten no TsuruDodge
Zaatakuj w trakcie uniku, by zadać wrogom przed sobą Physical DMG.
Press during a dodge to activate:
Launch multiple piercing attacks ahead, dealing Physical DMG.
-
Unik
Dodge Counter: Hidden Edge
Zaatakuj podczas Perfect Dodge, by skontrować za Electric DMG. Podczas kontry Harumasa jest nietykalny.
Press during a Perfect Dodge to activate:
Pierces enemies in front, dealing Electric DMG.
Character is invulnerable while using this skill.
-
Atak łańcuchowy
Chain Attack: Kai - Hanare
Priorytet Priorytet rozwijania 3 z 6 Zadaje Electric DMG na dużym obszarze. Strzała tworzy 6 Electro Quivers po trafieniu, a Harumasa jest nietykalny.
When a Chain Attack is triggered, select the character to activate:
Unleash a piercing attack on enemies in a large area ahead then fire an enhanced arrow, dealing massive Electric DMG.
When the arrow hits the ground, it generates 6 Electro Quivers.
Character is invulnerable while using this skill.
-
Atak łańcuchowy
Ultimate: Zanshin
Przy maksymalnym Decibel Rating zadaje Electric DMG na dużym obszarze. Harumasa jest wtedy nietykalny.
When Decibel Rating is at Maximum, press to activate:
Unleash a piercing attack on enemies in a large area ahead, dealing massive Electric DMG.
Character is invulnerable while using this skill.
-
Atak łańcuchowy
Zanshin - Scattered BlossomsChain
Activates ALT automatically after Ultimate: Zanshin:
Unleashes a wide-area piercing attack against enemies in front, dealing Electric DMG. This is considered Ultimate DMG.
Character is invulnerable while using this skill.
-
Wsparcie
Quick Assist: Braced BowAssist
Priorytet Priorytet rozwijania 6 z 6 Gdy aktywna postać zostanie wyrzucona w powietrze, wejdź za Harumasę i zadaj Electric DMG. Podczas ataku jest nietykalny.
When the active character is launched, press to activate:
Unleash a piercing attack at enemies ahead, dealing Electric DMG.
Character is invulnerable while using this skill.
-
Wsparcie
Defensive Assist: YugamaeAssist
Paruje nadchodzący atak i zadaje dużo Daze. Harumasa jest wtedy nietykalny.
When the on-field character is about to be attacked, press to activate:
Parries the enemy's attack, dealing massive Daze.
Character is invulnerable while using this skill.
-
Wsparcie
Assist Follow-Up: Yugamae - Slash
Zaatakuj po Defensive Assist, by wykonać serię cięć za Electric DMG. Harumasa jest wtedy nietykalny.
Press after a Defensive Assist to activate:
Unleash a series of slashes at enemies ahead, dealing Electric DMG.
Character is invulnerable while using this skill.
-
Unik
Dash Attack: Hiten no Tsuru - SlashDodge
While there are X-Marked enemies on the field, Harumasa will enter the Awakened state, switching Dash Attack: Hiten no Tsuru for Dash Attack: Hiten no Tsuru - Slash.
While in the Awakened state, press during a dodge to activate:
Rush forward to the closest X-Marked enemy and execute a powerful slash, dealing Electric DMG. Hitting a Stunned enemy triggers Chasing Thunder, dealing 1 instance of additional Electric DMG.
When the slash hits the target, it consumes 2 stacks of Electro Prison. With less than 2 stacks of Electro Prison, X-Marked will be removed from the enemy. Before X-Marked is removed, repeatedly press to repeatedly use Dash Attack: Hiten no Tsuru - Slash. While no X-Marked enemies exist on the field, Harumasa leaves the Awakened state.
While in the Awakened state, press after Basic Attack: Falling Feather to quickly follow up with Dash Attack: Hiten no Tsuru - Slash.
Enemy attacks can be blocked during the 1st hit of the skill. The pursuit effect of the second and third hits is increased.
During skill activation, Anti-Interrupt level increases, and DMG taken is reduced by 40%.
-
Umiejętność główna
Core Passive: Day Break
The CRIT Rate of Dash Attack: Hiten no Tsuru - Slash, Chasing Thunder, and Ultimate increase by 25%. When Harumasa's Dash Attack: Hiten no Tsuru - Slash/Ultimate triggers a critical hit against an enemy, he gains 1/6 stacks of Gleaming Edge. Dash Attack: Hiten no Tsuru - Slash can grant a maximum of 3 stacks per activation, and Gleaming Edge can stack up to 6 times, lasting 5s. Repeated triggers reset the duration. Each stack of Gleaming Edge increases the CRIT DMG of Dash Attack: Hiten no Tsuru - Slash, Chasing Thunder, and Ultimate by 12%.